Planning your garden in 5 easy steps
Planning your garden is crucial to ensure a bountiful and aesthetically pleasing harvest. Following these steps will prepare you for an effective planning process you can work on over the winter months. Whether you have a large backyard, a few raised beds, or a patio, this action-oriented article will help you get started.
Materials needed:
- Pencil and paper (or sketchbook)
- Optional: markers, pens, colored pencils, etc.
- Optional: digital tablet with sketching app
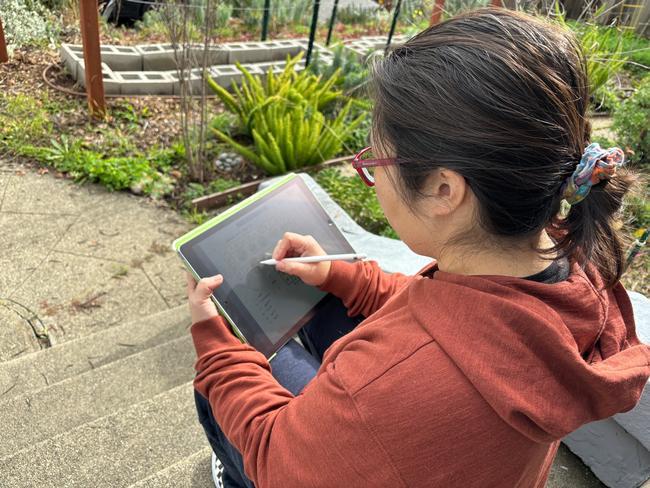
While you could do this on a computer or with online tools, we recommend doing the initial planning with pencil and paper. It can be quicker and more enjoyable, especially when working outside. The idea is to create a first rough sketch, which you continue to revise throughout the winter, and even create a final version on a computer. You can also use a digital tablet with a sketching app, too. For this article, we used a digital table to help illustrate the images better.
As you work through these steps, don’t feel compelled to finish them all at once. Planning your garden will take some research, and taking breaks and revisiting as inspiration strikes is helpful.
Step 1. Create a base map
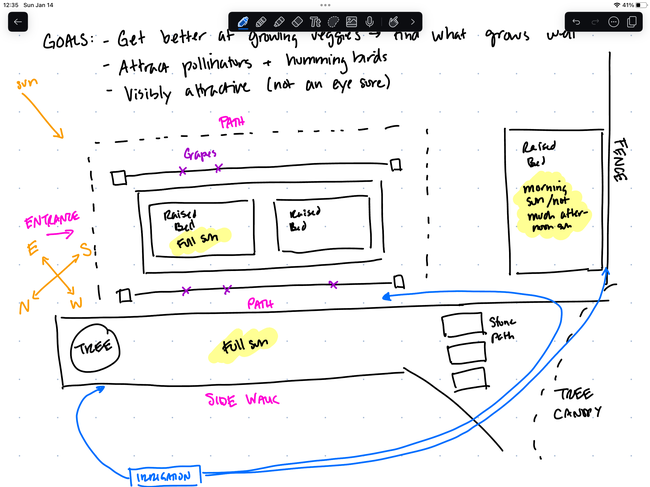
Start with a map with basics such as permanent structures and consistent environmental factors. At this step, exact measurements aren’t critical. Focus on capturing your garden elements' approximate shapes and sizes, ensuring a general sense of proportion in the shapes and structures.
Include on your map
- Permanent structures—like raised beds, paths, fences
- Existing entry points—gates, openings
- Sun direction—add a simple compass rose (i.e., the symbol for cardinal directions)
- Sun exposure—the amount of sunlight in the various areas of your garden
Planning tips
- Sun direction—The sun rises from the east, and south facing gardens get the most exposure to the sun. Understanding where your garden is concerning eastern and southern directions will influence which plants go where.
- Sun exposure—Consider any trees or other potential obstructions impacting your garden’s sun exposure. If you’re unsure, observe how the sun hits the location throughout the day (e.g., early morning, late morning, noon, early afternoon, late afternoon). Factor in time of year. If you have trees, there may be more leaf cover above in spring and summer. In addition, shadows from neighboring structures will vary depending on the sun's height. If you have some options for a garden location, consider the area that gets the most sunlight. Most vegetables need a good amount of sun to thrive. If a sunny spot isn’t available, you can still grow vegetables that do well in partial sun.
- Water drainage—Observe how your potential garden area handles water. If it puddles, this might not be an ideal location, or you might have to mitigate the area with a raised bed garden or other solutions.
- Garden area access—If you have flexibility with the placement of your garden beds or raised beds, keep in mind how you’ll access the plants (e.g., weeding, watering, harvesting). For example, a large 8’x8’ bed might not be great if you can’t reach the middle easily. Instead, two 4’x8’ beds will make it easier to access all areas of the beds. Think about how you'll water your garden and identify the easiest way to access water.
Additional resources
- Tips on identifying a good garden location from the broader UC Master Gardener Program
- Determine your yard’s sunlight exposure with SunCalc—enter your address to get a sense of the sun’s path at any given date or time. The exposure changes throughout the year, so test a few different dates in the spring and summer seasons.
Step 2. Identify your goals
Think about what you hope to accomplish with your garden. Having goals can keep your planning focused and less overwhelming. Note your goals on your base map.
To find your goals, ask yourself
- Is the garden for aesthetic enjoyment, to provide food for your table, or both?
- Are you learning a new hobby, improving your gardening skills, or experimenting with different plants?
- Are you interested in attracting pollinators and native wildlife?
- Are you creating this garden to work outside more, keep busy, get fresh air, and so on?
- How much time do you have to maintain the garden?
Additional resources for inspiration
- Sustainable gardening by UC’s California Garden Web
- Attracting native bees and other pollinators by UC’s California Garden Web
- California native plants—this blog post covers the basics of why plant natives and what to be mindful of.
- Growing fruit and nut trees from UC’s California Backyard Orchard
- Visit our demonstration gardens for in-person inspiration
- Container gardening basics and ideas by the UC Master Gardeners of Santa Clara County
Step 3. Brainstorm ideas for your garden plan
Deciding what to put in your garden is the fun part of planning! Brainstorm what plants or other elements will contribute to your goals. Try creating a mind map – visual diagrams where related elements branch out from one another. A mind map can help you brainstorm more ideas and organize your thoughts.
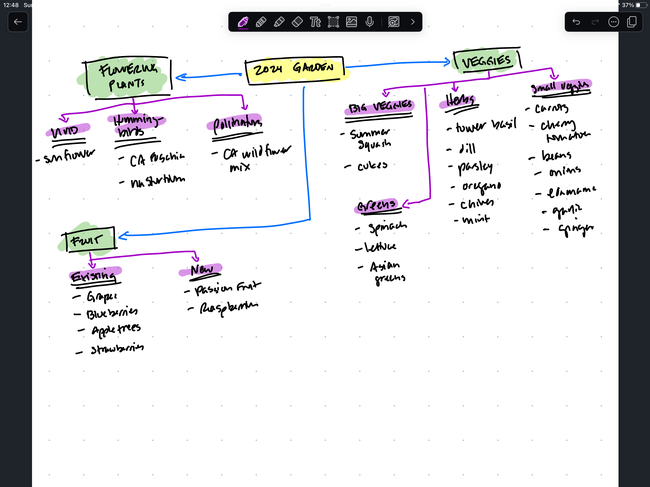
Options for mind maps
There are several tools you can use for creating a mind map, including:
- Pencil and paper—this might not offer the most flexibility
- Note cards or sticky notes—because these are smaller, you can write lists and rearrange or remove them as needed
- Writing software—any writing tool on your computer or smartphone is a great option. Using this, you can create an outline using bulleted or numbered lists to keep things organized. Using your computer or smartphone makes it easier to edit and rearrange items.
- Mind mapping software—software specifically for mind mapping offers the most flexibility with the ability to visualize the map. You can usually find them by doing an internet search. There are a few free ones or ones that offer a free trial.
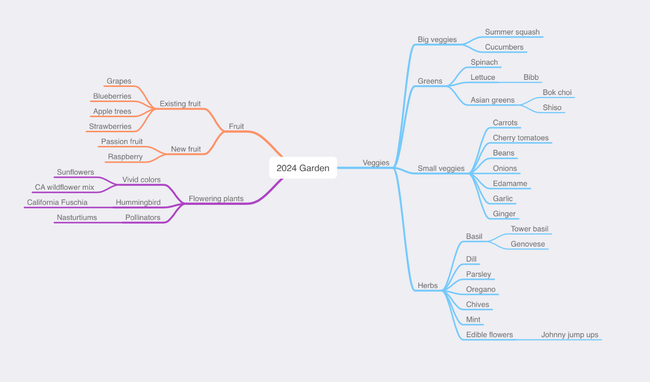
Brainstorming tips
- Vegetable gardening—consider creating a “food menu” and list staple crops, like beans, potatoes, tomatoes, peppers, and more. Think about what vegetables you like to eat and what you don’t enjoy. Grow what you love!
- Finding ideas—think about each goal and list plants and vegetables that meet it. There might be some overlap of ideas across goals.
- Climate—understanding your USDA’s Plant Hardiness Zone, which is based on winter low temperatures, can help lead you to what might grow well in your yard. Many California gardeners also consult the Sunset Garden Zones, which consider the length of the growing season; timing and amount of rainfall, summer highs, wind, and humidity; and offer more gradations. Consider these as guides, not steadfast rules. Alameda County has different microclimates; even within your yard, you can have a mix of microclimates. Some plants might do better than others, even if listed outside their designated zone.
- Take your time—brainstorming can be overwhelming, so take breaks in between. Consider walking around our demonstration gardens for additional inspiration or to narrow your ideas.
After your initial brainstorming, start to narrow your ideas. Considering which varieties of plants and vegetables do well in your location can help you achieve your goals.
When narrowing your ideas, ask yourself
- Is there a variety that does better in your climate?
- How easy or difficult is a plant or variety to grow?
- How much space does the plant need?
- How much sun and water does the plant need?
- How long will it take to harvest?
- Is maintaining this variety easy or difficult?
Additional resources for inspiration
- Assessing your microclimate—the UC Master Gardeners of Marin County have a tool you can use to understand what microclimates exist in your yard.
- Calscape Bay Area Garden Planner—this quick tool can point you to native California plants suitable for our area and your goals.
- Vegetable Planting recommendations for gardens west of the East Bay Hills (PDF)
- Vegetable guidance from the California Garden Web.
- Recommended vegetables for bay-side areas in Alameda County—UC Master Gardeners at the Lake Merritt Trials Garden grew different varieties of vegetables to see how well they’d do in our area. They have several “tried and true” recommendations.
- Outstanding plants of Alameda County—these brochures highlight native species that do well in our area.
- Vegetable guides for Contra Costa—the UC Master Gardeners of Contra Costa County detail what vegetables grow best in their coastal and inland regions. Since they’re close to Alameda County, these suggestions might be helpful in narrowing your choices.
Step 4. Designate areas in your garden plan for your garden ideas
Next, jot down on your map where you might grow the plants in your garden. If you make rows, they should run north and south, not east and west. Consider factors like sun exposure, plant height, space needs, and so on as you identify their locations. With so many factors to keep in mind, this can feel overwhelming. We recommend starting with a logical priority (below) to make things easier.
Mapping order by priority
- High-maintenance plants—these are the ones that need the most sun and prime real estate to thrive (e.g., tomatoes and peppers)
- Vertical plants—which plants need a trellis, staking, or other support to grow (e.g., beans, cucumbers, etc.)? Consider planting them behind other plants that need south facing sun exposure so they don’t shade the others. Taller plants should be on the north side of the garden to avoid shading other plants.
- Shade-loving plants—place these plants in areas that don’t get as much sunlight. They might benefit from being shaded by the vertical plants.
- Spreading plants—plants that tend to sprawl out, like pumpkins, melons, or squash, can take up a lot of space. Consider planting them near the edges of your garden areas or raised beds so they can grow along paths and not interfere with other plants.
- Staple crops—Next, place your staple crops like potatoes, carrots, onions, etc.
- Heavy water-dependent plants—Add any plants that are heavily water-dependent to your plan. Think about grouping these plants together to make watering easier and more efficient.
- Quick-access plants—If you are growing things you’d want easy access to, like herbs, place these plants closest to entries in beds where they’re easy to pick what you need.
- Intercrop plants—Lastly, add any companion plants to your map. Intercropping is the practice of growing two or more crops together to benefit from biological interaction. Intercrop plants can increase pollination, deter pests, improve soil, and much more. An option is to plant these surrounding your garden beds, which also provides an aesthetic appeal.
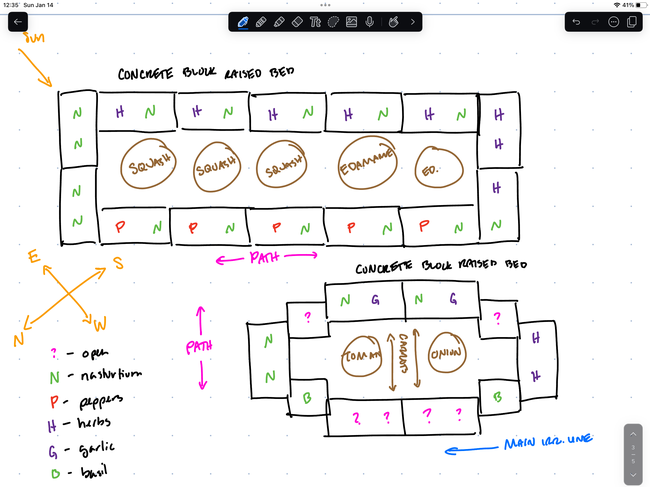
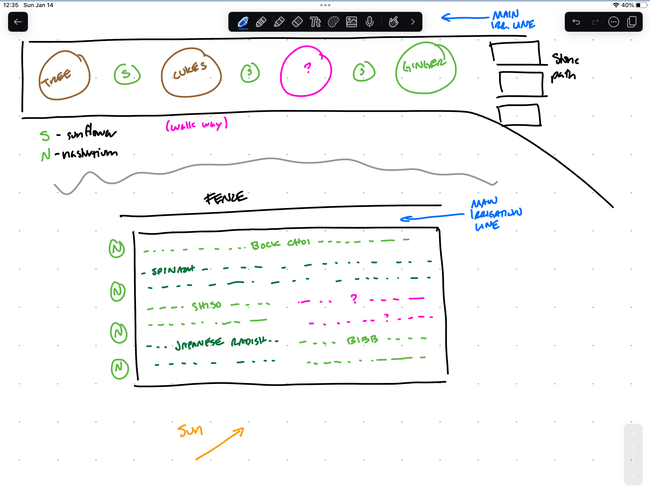
Planning tips
- Keep some spots empty—It’s tempting to fill in every inch of space but leave some areas empty. This way, you have room if you have extra plants, find new inspiration or a friend gives you some extras from their garden.
- Rearranging—Planning your garden can be like a puzzle. You might have to rearrange some plants here and there until you feel like you have a good layout.
- Keep things simple—If you’re running out of space, you might be adding too much to your garden. Consider removing a few plants or varieties and focusing on the ones most important to you.
If you’re new to gardening, we recommend starting small until you get the hang of gardening, learn what you like, and understand your space better. Building this knowledge will let you evolve your garden in the coming seasons.
Additional resources
- Tips on making use of your space efficiently from the broader UC Master Gardeners Program)
- Companion planting info from the UC Master Gardeners of Butte County
- Vertical Vegetable Gardening (PDF)—this presentation by the UCCE of Trinity County includes several ideas for vertical structures
- Efficient use of space by the broader UC Master Gardeners Program
- Small space gardening tips by Linda, one of our Master Gardeners
- Cool-weather vegetables—we list out some great options for when the weather gets cooler
Step 5. Consider entry points and paths
You might be unable to move or remove entry points and paths and that’s OK. For example, the entrance gate to a backyard is a permanent fixture. However, you might have some flexibility with determining additional entry points within or the flow of accessing your garden. Strategically plan entry points and gates to enhance visual interest and guide the people through the garden.
Add to your map
- Entry points—gates, open areas to enter the garden
- Paths—this is how you will access areas of your garden. Add arrows for the direction people should walk.
Ask yourself
- Do you need your plants inside a wire structure to prevent wildlife from eating them? Would you need a gate for that?
- How wide does your path need to be if you’re navigating your garden? (It's important to avoid walking on the soil and garden beds.)
- Where is the water source for your garden? Can you easily access it? How will you navigate through your garden to water it if you're using a hose? What will the layout look like if you use an irrigation system? Is connecting it to a water source easy with little effort or disruption?
- Do you have enough paths to access and maintain your plants?
Finalizing your garden plan
We encourage you to work on your plan over the winter. It’ll be easier to work on one step at a time so you can process and do any necessary research. It’ll also give you opportunities to find inspiration along the way. Continue to add notes, ideas, or tasks. Once you feel like you’re close enough, you can measure out spaces to get a more accurate sense of how many plants you need and what supplies to purchase.
Additional resources
- Contact our Help Desk if you have questions or concerns or want feedback on your planning. We’re here to help!
- Drip irrigation basics—the UC Master Gardener Program of Sonoma County provides an extensive guide on drip irrigation
- Building raised beds (PDF)—this UCANR publication includes how to build your own raised beds

