Starting Seeds for Your Summer Garden Indoors
By Linda Carloni

Benefits of starting indoors from seeds
- A packet of seeds is very inexpensive - Lower cost=more economical.
Greater number of varieties available. Local nurseries only carry a limited number of popular varieties. A quick perusal of the seed catalog will yield so many more tantalizing possibilities! This greater variety allows you to pick seeds for your microclimate. One example: many tomato varieties that grow well in the hot summers of Pleasanton won’t produce well in the cool to moderate temps of the city of Alameda. Plus, you can pick just the varieties you particularly enjoy. - If we have a wet late winter/early spring, you can start seeds indoors even if the soil is too wet or cold outside. Working wet soil, particularly if the soil contains a lot of clay, can damage the soil structure, compacting the pores, which decreases the movement of air and water through the soil that plants need. If the soil is too chilly, it will take longer for the seeds to germinate and they may rot instead.
- Moving indoors lets you get started sooner so you can be prepared for your ideal planting date.
- If you start your seeds indoors, you avoid the problem of birds, squirrels or other critters munching up the seeds or the tiny green plants before you even get a chance to see them.
- The joy of seeing that tiny seed you planted producing bountiful summer vegetables.
Drawbacks of starting from seeds

- Seed starting requires more advanced planning, time, and patience from the gardener.
You may need some equipment. If you are starting seeds indoors, you’ll need special lights unless you have a spot that is warm and sunny during all daylight hours. A dedicated light on a timer and a germination heat mat greatly speeds along the process.
What You Need to Start Seeds
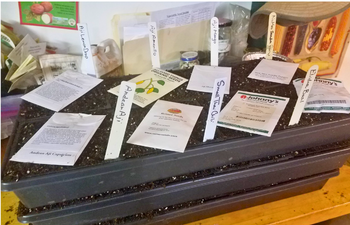
- Soil.
When you start small seeds (tomatoes, peppers) in containers you should use seedling mix soil blend available at any garden center as your planting medium. Many commercial seedling mixes are sterilized, which kills pathogens and weed seeds that may attack or overwhelm the starts. Standard commercial potting soil is fine if your seeds are large (squash, cucumber, etc). Soil dug from your garden is a bad seed-starting medium – it can contain pathogens or weeds. - Planting Containers
Planting containers can be many things: plastic six packs, other small pots, old food containers or drinking cups with drainage holes punched in them, and a variety of commercial options. If the container has been used previously, wash it, and then sterilize with a solution of nine parts water to 1 part bleach. Rinse well.
Another technique is to use soil blocks - a compressed cube of soil. You’ll need a special tool to make these blocks and a slightly different medium. - Grow Light
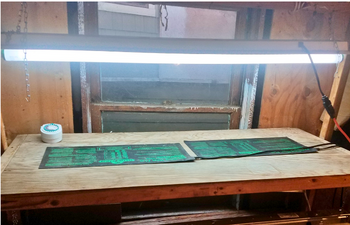
Unless you have a perfect spot near a window that is warm and gets sun during all the spring daylight hours, a dedicated electric light on a timer is essential. You can purchase a grow light or a shop light commercially or, if you or someone who will help you is handy, you can assemble your own. You want to keep the lights 2″ to 4″ above the seedlings so you’ll need to adjust the light as they grow. Some seeds need light to germinate (your seed packet should note that), but light is particularly important after the seeds peek out. Seedlings will grow better if you provide 16 hours a day of light. Not enough light will make the seedlings spindly and sparse. - A Germination Heat Mat
A germination heat mat is very helpful, but not critical, so long as the seeds get the warmth they need another way. Heat mats provide the optimum germination temperature for common vegetable seeds, as well as the length of time germination typically takes at various temps (as you might guess, warmer is faster, up to a point). Be careful not to overheat your seeds. A heating pad used for aching muscles will be too hot.
How to Plant
Finally, time to actually plant the seeds! Fill the containers with moist seedling mix. Your seed packet will tell you how deep to plant the seed in the soil. Typically, seeds are planted down 2 – 3 times the seed diameter, and sometimes less. Watch Birgitt Evans, long-time Master Gardener of Alameda County and expert vegetable grower, shows you the seed-planting process in detail.
Tip: for small seeds, try folding an index card in half lengthwise, and putting the seeds in the fold. A careful tilt and tap can give you just the number of tiny seeds you need in that cell. Adding two seeds to each cell, spaced apart, gives you a greater chance of successfully germinating at least one.
When to Start
When starting seeds indoors, you’ll need to work backwards from when you want to plant the seedlings outside. With a seed germination mat and have good dedicated light, tomatoes, peppers, eggplants, and basil require 4 - 8 weeks of growth and cucumbers and squash require less than 4 weeks. The seedlings will take longer to sprout and grow if it’s cooler or you have less light.
Care and Feeding
Watering
Keep the soil mixture moist but not wet. Some gardeners water from the top (misting will keep the seeds from getting displaced). Others put their containers on a tray with warm water in the bottom and when saturated, move them so they can drain. Take care not to leave the containers sitting in water all the time – that may make the soil too wet, and then the seeds can rot. Check the containers often. Small containers dry out rapidly and both the lights and the heat from the germination mats really dries out the soil.
Fertilizing
Most seedling mixes contain few nutrients. If your soil mix does not contain a fertilizer, apply a complete liquid fertilizer for vegetables at half the strength indicated on the package as soon as the second set of true leaves appears (these are the ones that look like small versions of the plant you are growing). Note: A complete fertilizer is one that contains nitrogen (N), phosphorus (P), and potassium (K).
Hardening Off
Seedlings started indoors often do not respond well to being moved out into the garden abruptly. About 2 weeks before you want to plant the seedlings, start getting them used to the outdoors gradually. Place them outdoors in a location without too much wind and start with 2 -3 hours outdoors in the sunlight. Gradually increase the amount of time outdoors in the sunlight each day. Bring them in at night for 5 to 7 days. After that, leave them out all day and night in a sheltered location, checking carefully for moisture frequently. But, if frost is in the forecast, bring your seedlings indoors. Move them as needed so they get 6 – 8 hours of sun each day, but keep them in a protected area. Seedlings are sensitive and can wilt and dry out if they get too hot. While you don’t want too much wind on the little plants, try to make sure they get air movement, as that helps them grow sturdy stems.
Direct Seeding
Some summer vegetables can or should be started by planting directly into the ground. Carrots and parsnips don’t transplant very well, so should be started through direct seeding. Corn should also be direct seeded. Beans of all types are happily direct seeded but can also be started in pots. You can directly seed cucumbers and squash but starting them indoors will give them a nice head start. Tomatoes, peppers, eggplants, and basil should be started in containers indoors because they need a long growing season.
Planting Outside and Protecting the New Seedlings
When do I direct seed, or put the warm-season seedlings out? You can find planting schedules for popular vegetables in these guides - choose the right one for your location.
These are guides for a relatively large area, if you are in an area that gets frost, be sure to check the typical last frost date for your immediate area, and delay planting your veggies until after that.
Note: If you are planting spring vegetables that can struggle in summer, like broccoli, cauliflower, or peas, they should be planted outside in February or March (depending on your area) for a late spring/early summer harvest.
Generally, seedlings should be planted at the same depth as in their starting containers. To encourage additional rooting, tomatoes, squash and cucumbers can be repotted deeper - up to their first true leaves.
After the seedlings go outside, they are still very vulnerable. You can give them some protection using a plastic milk container that surrounds them and has the top and bottom cut off. You can also use a mesh or very lightweight fabric row cover to protect them. Anything that covers the plants must allow the light to get to the plant.
Why not give it a try? Once you’ve successfully harvested plants grown from seeds you’ve started yourself, it’s hard to go back to nursery seedlings.
More Resources on Vegetable Gardening
- Seeding Vegetables Indoors
- Growing Your Own Food
- Vegetable Gardening Basics
- Food Gardening: How to Grow Edibles
Want to learn more?
This blog post is brought to you by the Help Desk of the UC Master Gardeners of Alameda County. Subscribe to our blog!
Have a gardening question? We'll help. You can reach us by:
- Emailing acmg@ucanr.edu. Please include a photo of the problem, if you can, plus your name, phone number, city and a description of the problem.
- Using our online form.
- By phone, during our office hours, 10 am to noon Wednesday and 11 am to 1 pm Thursday: 510-670-5645. At other times, please leave a message and we'll return your call during our office hours.
- In person at our Hayward office, during our office hours, only by appointment.

